Keyframes
https://www.youtube.com/watch?v=g7g2GKQSP8I
The Solar System
http://web.cse.ohio-state.edu/~parent/classes/682/MAYA/MayaSolarSystem.pdf
Thursday, May 26, 2016
Tuesday, May 24, 2016
More portrait adjustment techniques in Photoshop
Double Exposure
Dramatic Portrait
Outdoor Retouching
High End Beauty Retouching
Indoor Fashion Tutorial
Please work through at least TWO of these tutorials today (Tuesday, May 24).
Dramatic Portrait
Outdoor Retouching
High End Beauty Retouching
Indoor Fashion Tutorial
Please work through at least TWO of these tutorials today (Tuesday, May 24).
Thursday, May 19, 2016
Editing Fashion Pictures and Magazine Cover
Fashion Cover Work
You will create a magazine cover page using your best Fashion picture. You will also create a 12-picture photo spread that details what your subject is wearing. Before I give you some tutorial examples, here and here are some example covers. Click on the images to get ideas for your cover.
Before you start your cover, you need to edit and adjust your pictures to make them look professional. Here is a list of adjustment methods we did last semester:
Clone Stamp (CS)
Patch Tool (P)
Gaussian Blur (GB)
Color Hair (CH)
Whiten Teeth (W)
Removing Hot Spots (HS)
Healing Method (HM)
Glamour Skin Softening (GS)
Adjustment Tutorials:
https://www.youtube.com/watch?v=oJt0E1fMR-M
https://www.youtube.com/watch?v=a9CRJXVfnVo
https://www.youtube.com/watch?v=DkiXrRw8Obg
If you do not remember how to do these adjustments feel free to use the Photoshop book at the front of the room. Take your time. You have a few days to adjust your pictures and make your cover and picture spread. The bottom line is this: get rid of blemishes, tone down hot spots or glare, soften the skin, adjust colors for emphasis, use black and white (greyscale) if necessary, crop for effect, and play around with brightness/contrast etc.
Magazine Cover Tutorials: You can use the tutorials or create a cover without a tutorial.

https://www.youtube.com/watch?v=Oq3DuhaJGTw
https://www.youtube.com/watch?v=3aAP1-hoEHk
http://www.myphotoshoptutorial.com/2009/01/easy-magazine-cover-in-photoshop/
http://www.tutorialstraining.com/cstutorials/advertisingdesign/magazine/twistrcodedtutorial.htm
http://huzeyk.blogspot.com/2006/02/magazine-cover-masthead-editing.html
http://www.tutorialized.com/view/tutorial/On-the-Cover-of-Rolling-Stone-Magazine-Cover-in-Photoshop/32171


After you create your cover you need to add text to 12 of your pictures. This text, done in the same style as the Action Pics and Spring Quote Pics, should tell us the brand of each item of clothing like this example:


A quote from the subject or something interesting about the items is also a nice touch.
Wednesday, May 18, 2016
Exporting From Adobe Premiere Pro and Dropping Into Server
These are the settings to export HD Quality Video
 File>Export>Media
Format=H.264 Preset=HD 1080p 29.97 Name your file in the Output Name. Call it " Your Full Name Stop Motion"


Click Export
Find your project in the area you saved it on the computer.
Next, drop your video in the Vidstore Server.
Password : Outback23

Format=H.264 Preset=HD 1080p 29.97 Name your file in the Output Name. Call it " Your Full Name Stop Motion"
Make sure you look where you are saving the file when you name it in Output name.
I would suggest saving it to Desktop.
Click on Desktop Background
Select Go at Top Of Screen
Connect to server
Type Vidstore.shorelineschools.org
Name: scvideo
Select SC Video classes
Place in Period 1
Tuesday, May 10, 2016
Stop Motion and Adobe Premiere
Please add a fade in to your Stop Motion video and a fade out at the end. To do this you must make your first and last picture about 6-8 seconds long. Right-click or Control-click on the clip and select "speed/duration."

 After you do this for both clips you should have long clips at the beginning and end of your video. At that point you can go in and use the pen tool to create a fade in and then fade out.

There are tutorials below that should help you with other items in Premiere. You need to add a title at the beginning and credits at the end.
Add Titles, Fades, and Music http://tv.adobe.com/watch/learn-premiere-pro-cs6/add-a-simple-title-some-fades-and-music/
Using Trim and Ripple Edit: https://www.youtube.com/watch?v=aXC2CUzifuU
Keyboard Shortcuts: https://www.youtube.com/watch?v=kjDqv6L9NPY&list=PL38648D595F475331
Tools: https://www.youtube.com/watch?v=qfGaxkMyz-w&list=PL38648D595F475331
Color Correcting: https://www.youtube.com/watch?v=ARQRByM6PYI&list=PL38648D595F475331
Titles and Effects: https://www.youtube.com/watch?v=hrzzDy9BeT8

Next, change the clip length in the duration section. Make sure to select "Ripple Edit, Shifting Trailing Clips."
There are tutorials below that should help you with other items in Premiere. You need to add a title at the beginning and credits at the end.
Add Titles, Fades, and Music http://tv.adobe.com/watch/learn-premiere-pro-cs6/add-a-simple-title-some-fades-and-music/
Using Trim and Ripple Edit: https://www.youtube.com/watch?v=aXC2CUzifuU
Keyboard Shortcuts: https://www.youtube.com/watch?v=kjDqv6L9NPY&list=PL38648D595F475331
Tools: https://www.youtube.com/watch?v=qfGaxkMyz-w&list=PL38648D595F475331
Color Correcting: https://www.youtube.com/watch?v=ARQRByM6PYI&list=PL38648D595F475331
Titles and Effects: https://www.youtube.com/watch?v=hrzzDy9BeT8
Photo 2: Fashion Shoot Assignment
You are working for a fashion magazine that sells clothing to a specific audience. Your job together is to shoot two picture spreads to sell two different styles of clothing and accessories. This includes pants, coats, shirts, scarfs, shoes, socks, belts, dresses, shorts, and anything else a person can wear.
10 suggestions for a great photo shoot.
Eight suggestions to create a solid fashion shoot.
Please look through, watch, and read about the following fashion shoots.
Examples:
Vanity Fair Fashion Shoots (multiple examples)
Kala Makeup Fashion Portfolio
Joie Magazine
Beyond The Sea
Grey Gardens
In the Trenches
Megan Fox
GQ: Best Suits
Details Magazine: Jeans
Kala Makeup Fashion Portfolio
Joie Magazine
Beyond The Sea
Grey Gardens
In the Trenches
Megan Fox
GQ: Best Suits
Details Magazine: Jeans
Top Ten Vogue Covers
True Blood
Jessica Biel
Katy Perry
Lighting
Fashion Setup
Your pictures should show a variety of composition and also showcase a variety of ways to light your subject. Please review lighting techniques here.
Please review portrait tips here.
Requirements:
You must choose a partner from class. You can work in groups of three, but you have to take pictures of each person.
You will model for each other on Thursday and Tuesday.
Contact sheets are due from each day at the end of the period.
You will shoot one day outdoors and one day in the studio.
Your location away from school needs to be unique and interesting on it's own.
Get creative. Play dress up. Dress stylishly and/or uniquely.
On Tuesday you will get together with your partner and answer the following questions. You will email me your responses during class time.
1. What are your names?
2. What types of clothing are you trying to sell?
3. What day are you using the studio?
4. What specific clothing will you wear each day? What accessories will you bring to enhance your shoot?
5. Where do you want to shoot outside of school? Why?
6. How will you ensure that you give 100% on this project? What can you do to make these pictures the best pictures you've taken in class?
7. How will you use lighting to make your pictures interesting? Be specific.
Bring your cameras Thursday and Tuesday. If you are shooting away from school you can go directly to your shooting location.
Wednesday, May 04, 2016
How To Import Stop Motion Pictures Into Adobe Premiere
How To Import Your Stop Motion Pictures Into Adobe Premiere
- Plug in your camera to the computer or place your memory card into the computer.
- Import your pictures by first opening Image Capture.
- Select on the pictures you want to import and make sure you notice where you are saving the pictures.


First, make a folder for your pictures. If you shot on multiple days please make sure your pictures are organized by day (make a separate folder for each day's pictures).
Select on just one of your pictures that you took for this project. Right
Write these dimensions down.


Open Adobe Premiere. Create a new project (File>New>Project) and name it Stop Motion. Click OK.
Select Digital SLR>1080p>DLSR 1080p30 and name your sequence. DO NOT CLICK OK YET.


Click OK after you change the Video frame size.
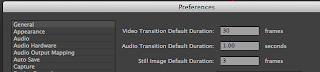
Go to Adobe Premiere>Preferences in the upper left hand corner. Click
General. Change the Still Image Default Duration to 3. (If your
pictures play too slow after changing these settings try changing them
to 2). Click OK/

Next, go to File>


Monday, May 02, 2016
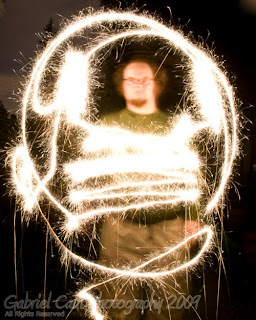
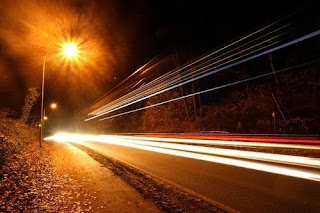
Photo 2: Long Exposure Assignments
This assignment will be broken into three parts.
Part 2 is nighttime long exposure. Click here to see some awesome examples.
Part
3 is long exposure pictures of your choice. You can do light painting,
you can shoot outdoors at night, or you an experiment with something
different. You can use people as needed. You can even shoot early
morning or late evening instead of at night.


Schedule :


Tuesday May 3rd: Bring lights to class. Shoot in studio or at home.
Thursday: Light painting at school in the studio.
Shoot in studio or at home.
Thursday: Light painting at school in the studio.
Shoot in studio or at home.
Shooting Day 1. Contact Sheets due both days.
Homework (you canstart now): One outdoor long exposure photo shoot done at night or early morning.
Homework (you can
Long exposure shots of your choice.
May 9th: Homework due.


Animation Peer Editing
Animation Peer Editing Questions
1. Is the animation
interesting? Why or why not?
2. What is the goal of the
game?
3. What are the two movie
clips?
4. What are the motion tweens?
5. What are the shape tweens?
6. What are the sound effects
or music in the animation? Are there sounds for everything?
7. Is the background detailed? If not, what needs
improvement?
8. Do the buttons work? Please
list any buttons that do not work.
9. List three ways you would improve this CYOA?
How could it be more entertaining?
9. List
compliments: what else is interesting or fun?
Subscribe to:
Posts (Atom)